Thursday, 21 July 2022

Bushido: Battle Report - Shiho vs Shiho (Wolf Clan)

Time to operate some Cult of Yurei magic and raise this blog from the dead for a battle report (I actually write a lot on it but I don't publish, using it just to consolidate notes and painting recipes).

Battle at the Shibuddha Shrine


Alerted by locals that a ragtag warband seems to be on their lands, the wolf clan makes a move only to realize they are what appears to be Shiho Ashigarus under the influence of a Takuya Impostor.

Guillaume's Shiho Ashigaru List:


Theme: Guerilla Warfare
Shiho Takuya (20pts)
Shiho Misaki (12pts)
Kazuki (15pts)
1x Loyal Kyudoka (14pts)
2x Loyal Yarimen (24pts)
2x Heimin (8pts)
-Vanguard ((x=2)+1pts) 
-Eagle Feather Arrow (1pts) - on Kazuki
-Veteran of Sagoya (1pts) - on Loyal Yarimen A
-Wooden Stakes (2pts)

The goal of the list is to have a frontline of archers that can then absorb enemy charges and be reinforced with 'Hold the Line' from the Loyal Yarimen. Thanks to Vanguard giving 'Scout 0/4' those archers are up the field to get good shots or pressure the opponent turn 1 and with 'Move It' from Takuya the list can be even more mobile.

I was facing:

Antoine Prime's Tanaka List:


Theme: Open Rebellion
Tanaka Tsuki (21pts)
Tanaka Gorak (19pts)
Tanaka Yue (13pts)
Tanaka Nobuko (16pts)
Tanaka Muna (14pts)
2x Tsuki's Pack (12pts)
-Primal Howl (4pts)
-Full Moon (1pts)

Classic strong Tanaka list, playable with just the starter (The Wolf Clan is probably one of the best purchase a Bushido player could make).

So two lists with no armor, no tough and with archers decent enough that you have to be careful.

SCENARIO: Idols


We Roll to see which player is Player 1 and Antoine wins the roll.

MAP:


DEPLOYMENT:


We rolled and got 'Corner Deployment'.
As Antoine's whole list benefits from Scout, I Sadly deploy every model, including my scouts, prior to his. I did manage to hinder a little some of his models with my Wooden Stakes.


Turn 1: 

Antoine wins the Tactical test and choses to let me go first.
We mostly move to cover to avoid giving good targets.

I Fire a Flaming Arrow from Kazuki to try and block some lines of sight and hinder his force's advance.


Antoine manages to get Yue to the center objective, sadly having ran and in cover it is a poor target. He manages to put an arrow with Tanaka Muna in my leftmost Heimin that ran dealing two points of damage to it (thus preventing the Uncloak action later on), two points from an arrow from Nobuko into Takuya which had stupidly moved in the open and one point of damage from a Wolf charge on the leftmost Loyal Yarimen that ran to the objective.

Turn 2: 

Things got crazy!
Antoine wins again the initiative.


He activates Muna to shoot Takuya who was still in the open. Luckily, I barely remembered the rule 'Bodyguard' from the Veteran of Sagoya card and instead, the Loyal Yarimen that was shadowing Takuya took 5 points of damage from the would-be lethal arrow. I would have been pretty unhappy had this shot hit Takuya as, with the damage from turn 1 I would have lost it top of turn 2 and this is exactly what happened to Takuya the only time I played it prior to this list. Veteran of Sagoya definitely made its '1 rice' back and so did that Loyal Yarimen!
Takuya then activated, moved as part of his simple Ki action and did 'Awe' on every Tanaka model except Nobuko.


''You get a Frightened token! And you get a Frightened token! Everyone gets a Frightened token!!''


Now aware of Bodyguard and how it works, Antoine tried to prepare for a Tanaka Tsuki attack by first engaging Takuya with Tanaka Yue. I did not take the bait and instead let Takuya get engaged but relied on the fact Yue was frightened to use 'Sidestep Attack' and left her ZOC thus leaving the Bodyguard option still active as neither Takuya nor the Yarimen were engaged by the end of this activation.
Tanaka Gorak engages Takuya who sidesteps away again.
The Loyal Kyudoka fires its bow at Gorak and kills it at short range, wasting Gorak's remaining action. I did take 5 points of damage on the first turn and another 5 on turn two but this action just brought me back in the game.

Gorak Got removed after Takuya Sidestepped, allowing the Loyal Kyudoka to take a clear shot at close range.


Antoine goes in against Takuya with both Tanaka Tsuki and a Wolf. After having seen Takuya survive so much and with both opponents Frightened, I decided to trust in Takuya's defensive capabilities to survive the turn.
I do bring at some point the Loyal Yarimen Bodyguard to assist vs Tanaka Tsuki, however I goof and went too aggressive, dealing one point of damage to Tsuki but that poor Yarimen takes 1 point back, dying in the process and no longer providing an assist.


Trying to bring back an assist after the Bodyguard Veteran of Sagoya died, the second Loyal Yarimen rushes to Takuya's rescue.


After all of Antoine's activation, Takuya would have survived...Had it not been for Tsuki's last action rolling a success level 1 on Takuya, rolling a natural 11 for the damage roll and with the +1 from her Daisho, manages to deal the exact 4 damages needed to kill Takuya. That 2 damage arrow from turn 1 did end up being lethal.

The Heimin went after the Wolf that had partaken in Takuya's demise. Getting a kill.


Turn 3: 

Things get crazier?
Antoine wins initiative. (Its a trend)
I declare the use of Guerilla Warfare so that all my Ki Boosts cost me 1 less until the end phase.
Yue activates and re-engage my Kazuki, I instantly use Hold the Line from the remaining Loyal Yarimen to bring her into Yue and roll three dice for Kazuki's defence and successfully managed to Sidestep Defence away from melee. 

You won't believe what happens next! Read to find out!


Kazuki then took a shot, Ki Boosted for an extra die and used the Eagle Feather Arrow...Success Level 5 on Tanaka Tsuki at close range in the open. Killing her on the spot. (Thanks to the one damage from last turn)


Later on the turn, Nobuko surprised Kazuki and returned the favor, avenging Tsuki.

R.I.P. Kazuki. You did great and killed Tsuki!

My Loyal Kyudoka reloaded and moved to shoot Nobuko for 3 damage.


End of turn 3.


Turn 4:

Antoine wins initiative. (When will it end?!?)


Small blue dice are accumulated Ki, the big dice are damage. As you can see, other than Misaki that just showed up, my forces are weary.

I declare the use of Guerilla Warfare so that I can reroll defence dice on wounded models.
Shiho Misaki shows up from Elsewhere on my left side. Unfortunately, the Heimin having tried to fight Tanaka Muna in the previous turn, Muna is facing in Misaki's direction and as such is not surprised when Misaki takes her shot. Despite the short range, cover provided by the objective means Muna only takes a damage from Misaki's double Ki-Boosted shot.
Muna fires back and deals three damage to Misaki.
Not to be undone, the loyal Kyudoka, having reloaded, moves and fire at Muna for a now surprise shot and manages to kill her on the spot. (he rolled three six on the dice to hit and I use Guildball Falconer's dice for my Shiho so this was as it was an omen)
Yue and Nobuko fight the Loyal Yarimen and kill her.

Another great shot from the Loyal Kyudoka.

Antoine scored 1 point from controlling two Idols. I remove the center one as to clear line of sight to Tanaka Yue and Tanaka Nobuko and because I'm fairly confident that with Tanaka Muna's death, I can regain control of the left side and maybe turn this into a victory in the next two turns.

Turn 5:

How wrong I was!
I Win the Initiative (at long last)
Antoine declares that my wounded models get -1 move (thanks to Open Rebellion theme bonus)
Yue charges Misaki and, on another success level 0, manages to deal the exact three points of damage needed to finish her.

A picture taken moments before things go worse.


The Loyal Kyudoka reloads then gets engaged by Nobuko. I sidestep away which was a mistake as I needed to do damage and no longer have the activation token to finish Nobuko.
Nobuko finishes the Loyal Kyudoka, leaving me with only an Heimin unable to turn idols on this turn... 
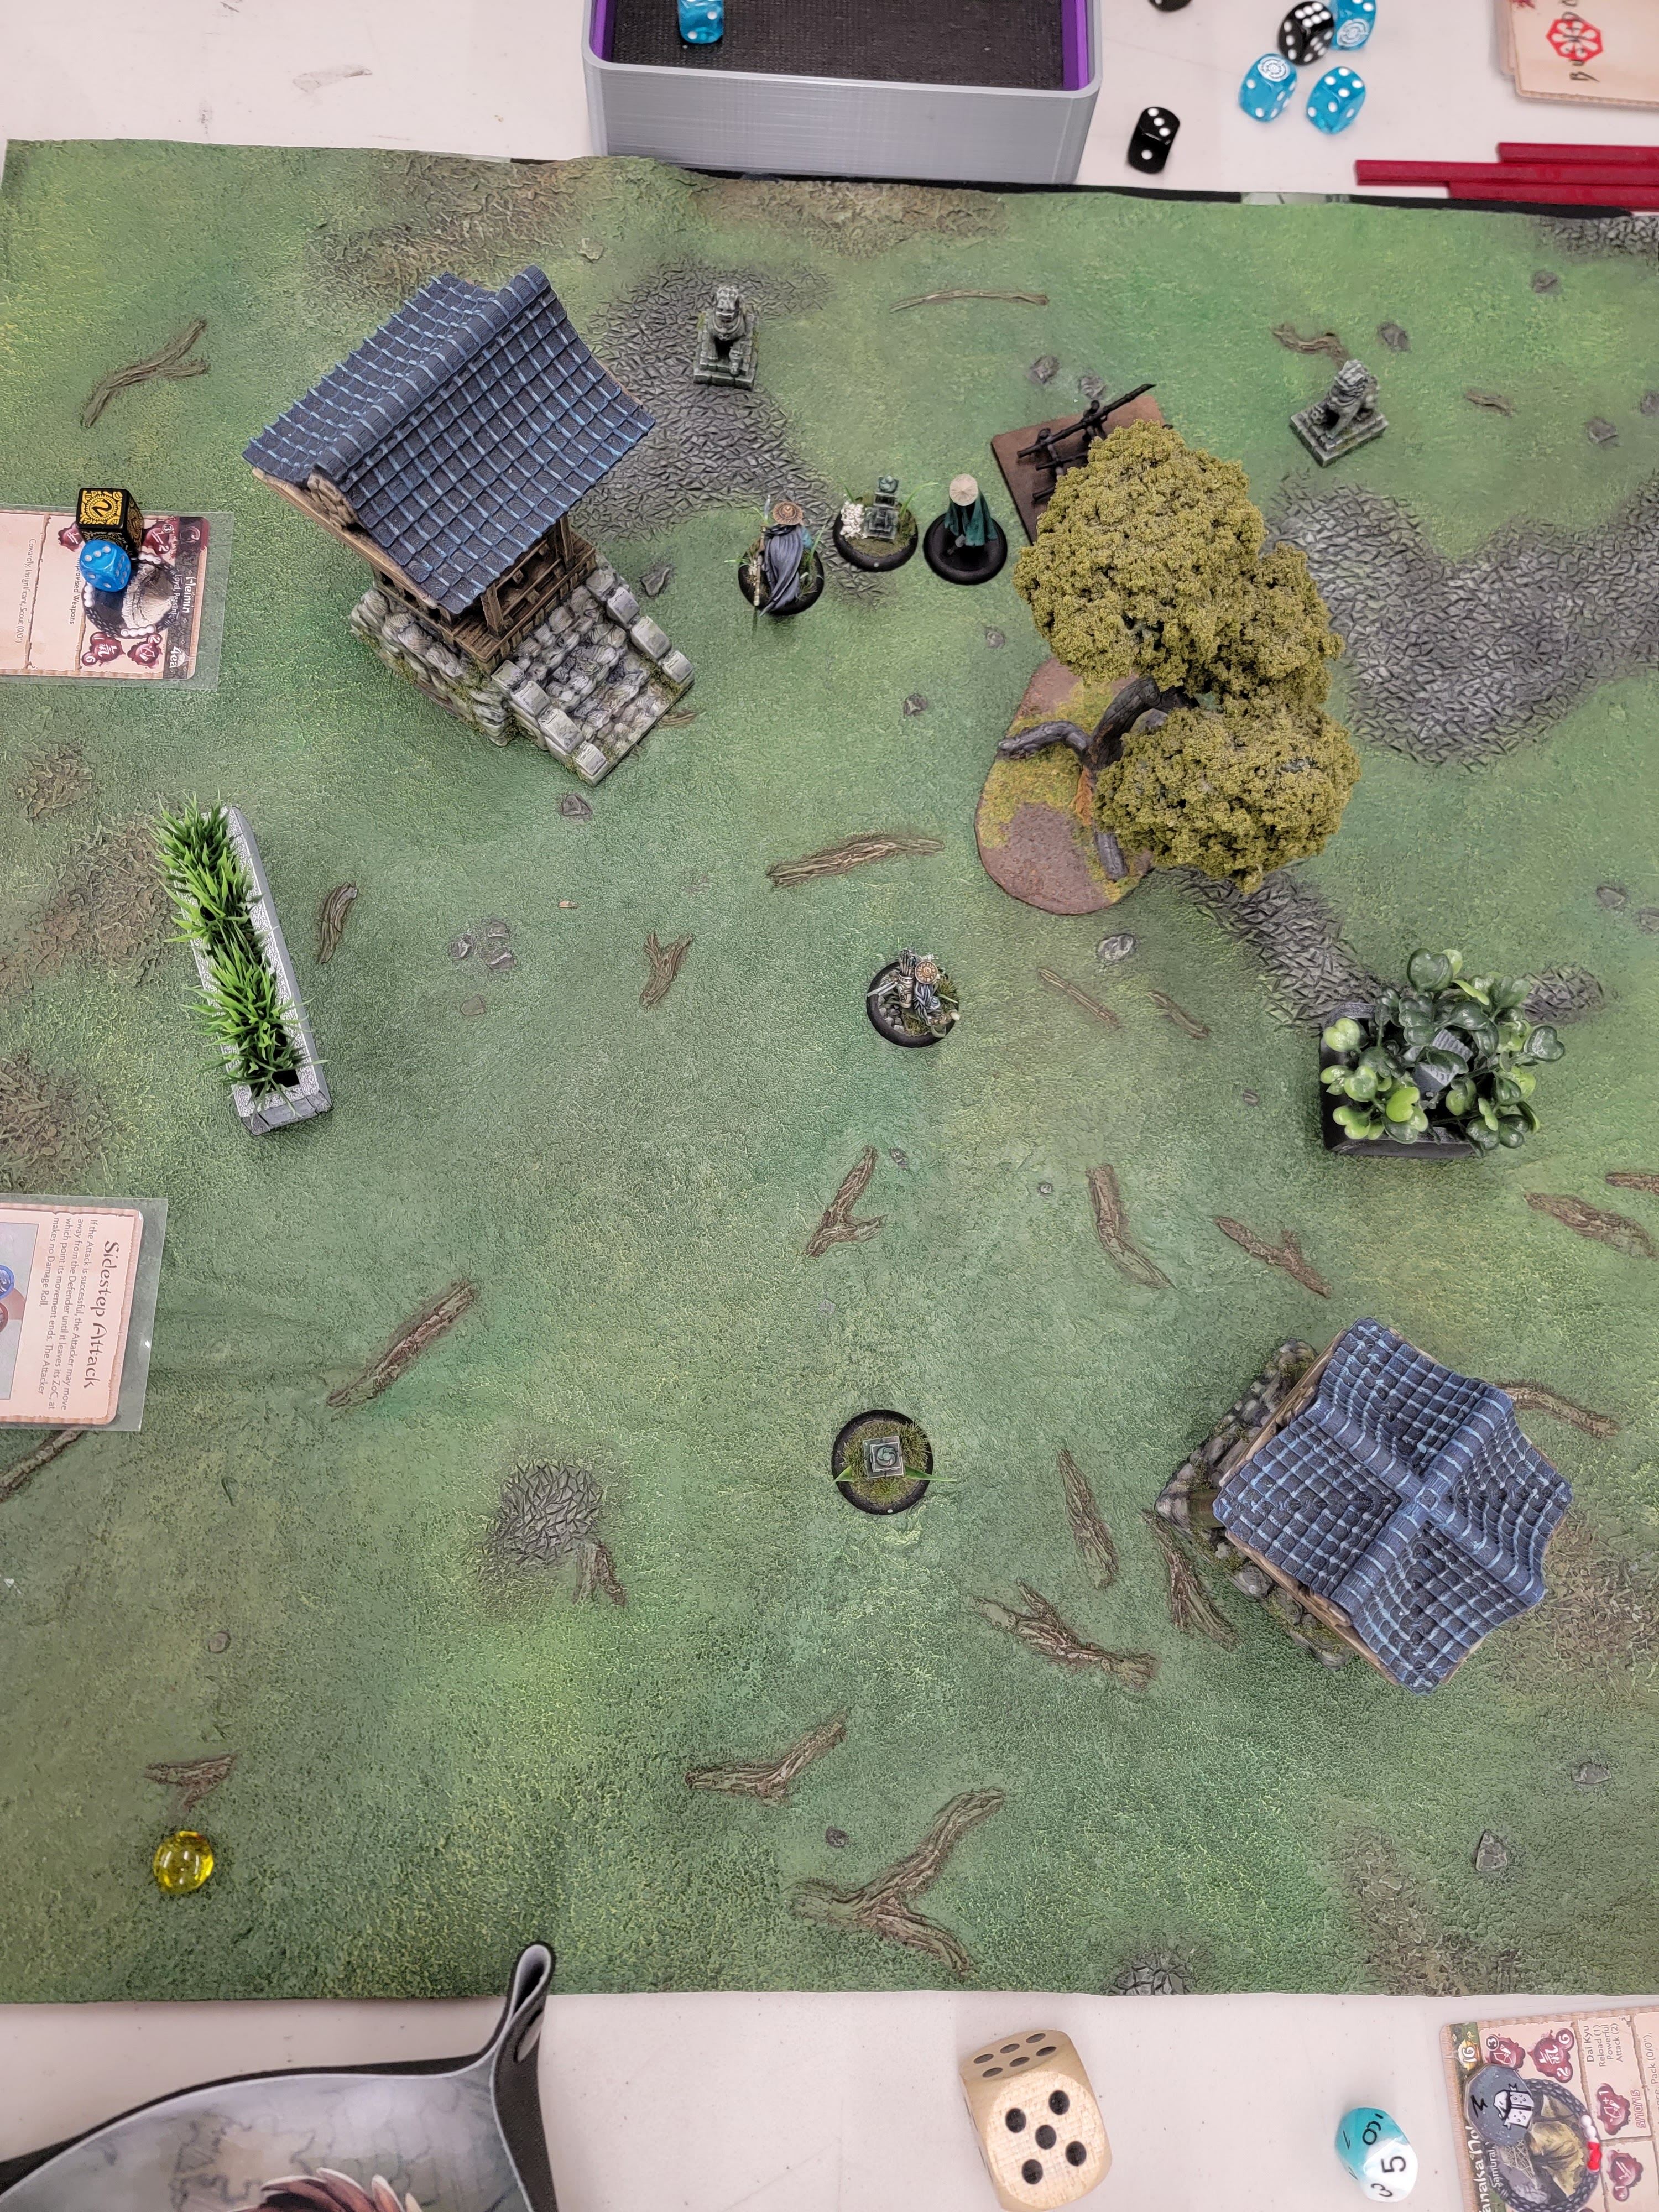
Endgame state.


Wolf Victory!!!


This was my best Bushido game yet! Everytime I tought I had gained control of the game, Antoine managed to remove a key model to swing things back.
I hope you enjoyed this battlereport as much as I enjoyed the Wolf Clan exposing the fake Takuya for who he was and dispatching the brigands that disguised themselves as his retinue.


Friday, 9 August 2019

Infernals: Agathon

Agathon

I just need to buy some cracked-earth effect to do a ''dead''base like warcraft3's Undeads.


Saturday, 22 June 2019

PulpCity: the Silver Menace vs the Geeks of the North

Lo and behold: the mediocre adventures of Supreme Grimm. Vol1, collector edition with alternate cover.

-Supreme Grimm vs the Communist Threat-


Citizen 1:"Did someone kick a deflated soccerball?"
Citizen 2: "Is it some kind of garbage bag caught in the wind?"
 No, its Supreme Grimm!!!


"Its over Siberian Tiger, I have the high ground."
The grimm the city doesn't deserve and doesn't need.

Tuesday, 5 March 2019

Rhinodons at the 2019 OTC (Ontario Team Championship)

I love warmachine team tournaments: you discuss strategies with teammates, plan pairings, try to get the best tables for your team and after the action you can discuss the heroic actions or tragic losses that impacted the overall team effort.
While they are fairly rare, I'm lucky that I can count on the Ontario Team Championship to bring all the joys of a nice big team tournament fairly close to home (6 hours drive).

This year, the event filled up before 'non-sponsored, non-premium' registrations even went live, to the point there were extra spots and an additional room rented for a whooping 38 teams. That's 190 warmachine players for you!

Major thing that affected the event: Circle and Skorne both got CIDs (updates to some of their models) and as a result were more popular, thus warping the meta and changing list building.

Now on a more Trollbloods-related discussion...


Thursday, 30 August 2018

40k Orks: Da Divershun From Da Skies (Blitza-Bommer)

Gulark laughed as the shots poured from his Blitza-Bommer down on his fellow footslogging orks. A stray shot exploded one of them and Gulark let out one of his famous “Wooops! Right place, wrong time!! …. or somefink like dat…”

Monday, 20 November 2017

Breast Cancer Brawl 2017: Bigger and Firmer

We continue our round of Team Tournaments in Canada with the 4th Team Tournament for the Montreal Rhinodons: the Breast Cancer Brawl (or BCB for short). As requested by the TO, the Montreal Rhinodons took the name of ''Bienvenue chez les Ch'Tits'' in order to have a bad pun involving breasts in the name.

As the tournament's name suggests, it was created to raise funds for breast cancer research as well as being a great opportunity to play some WarmaHordes games.

I went with the usual Rhinodons suspects: Tacin and Felix.


Welcome to the Ch'Tits!

No, its not a Chtulhu pun.


Monday, 22 May 2017

TTO PT 2: Consider Yourself Hired!

Terminating the Opposition Part 2: Consider Yourself Hired!

The Part 2 of my Terminal Directive campaign for the Android Netrunner Game against my opponent Tacin.

MAJOR SPOILERS AHEAD: Don't read this article of the following of ''Terminating the Opposition'' if you intend to get Terminal Directive. I would hate to ruin some of the surprises for you.

And if you don't care about spoilers or Terminal Directive, Part 1 is here.

Saturday, 20 May 2017

Terminating the Opposition pt 1: Moon Bioroids

So out of the blues my roommate and Android Netrunner opponent Tacin told me that he really wanted to get the new expansion of Netrunner: ''Terminal Directive''.

SPOILERS AHEAD: Don't read this article of the following of ''Terminating the Opposition'' if you intend to get Terminal Directive. I would hate to ruin some of the surprises for you

Tuesday, 31 January 2017

Moosecon: All the fun of a big con in a single day!

So in late October or early November, my roommate Tacin and myself had just finished our gaming basement and we had been playing fairly regularly warmachine with my friend Felix when the idea popped up that we could look for a fun team tournament to play as a team and motivate us to play even more games of Warmachine.

Looking around we found the OTC and Moosecon. I was asking if there was still spots open for the Ottawa Team Tournament when I got an admin message that said they had sold out under 7 minutes. Moosecon had still two spots open in the team tournament so I jumped on the occasion and registered the three of us to the challenge.

To secure the spot I sent a payment via paypal and the Montréal Rhinodons were born!

The cool logo Anaid (Tacin's wife) did for us

Monday, 15 February 2016

What's in the box - Kingly Wrath Edition, part the 2nd


Welcome to the second part of this series of articles on the unboxing/assembling/examination of a Wrath of Kings starter (I might stretch the series with the character boxes if people enjoy this enough).

Here's a link to part 1

In this column, we'll be looking at the pair of Specialists from the starter. A Specialist in this game, basically, if you're familiar with WarmaHordes terminology, is a rough equivalent to a Solo. They're deployed alone, can make an impact on the flow of battle, and will generally have a target painted on them for your opponent. Some are more of a back line buff/debuff type of unit, some are more of a front-line beatstick. It depends on the faction and on the Specialist itself.

In the House Nasier starter, the one I have, the two Specialists are a Rathor and a Longhorn. A pair of minotaur-esque-looking models. Trying to keep specific game lingo to a minimum, the Longhorn is a 40mm-based second-line beatstick (getting deployed 10 to 15 inches into the field) whose sole attack (melee) has greater to-hit chances and can deal a painfully large amount of damage (3 dice for attack by itself) and has a charge attack which allows it to clear a path to its target before charging, while the Rathor is a 50mm-based mid-field (deployed 5 to 10 inches into the field) who has a basic 1-die 8" ranged magic attack (which can bounce onto a secondary target within 3 inches of the first), a 2-dice melee attack with some defense reduction on the target and some knockback, and a 6" aura which denies enemies within it the use of some defensive skills.

So, starting with the Longhorn...

This is a pretty straightforward model - one piece body, two separate arms, two separate horns, and the base.

The horns are rather neat, with one having a hole while the other has a connecting pin, so that there can be no confusion as to where and how each one fits:


The body is large, with a decent level of detailing:


 The sword arm had a pair of mold extrusion bits, but nothing to worry about:


And the shield arm looked pretty clean:


And while sure, some of the mold lines are pretty obvious, the plastic is actually the hardest I've seen so far in my 15 years of messing around with miniatures. It feels tougher than the normal GW plastics everyone uses as a reference point, and is a PLEASURE to work with. Which is good, considering the Rathor, which follows:

A 13 piece model (14 if you count the base), the Rathor is a bit more involved as a build, but still has some nicely defined attachment points which keep you from messing up, and which make dry-fitting a breeze (even better during assembly - makes it so much easier than having to hold two parts for 5 minutes on end).

Here are the legs, right and left. Notice that one has a socket, the other one has an attachment peg, again, preventing any mistakes during assembly:


These connect to a lower body, which has a peg to connect to the upper body:
 

So far so good, right? Let's take a look at the upper body... and UGH! There's a mold spot which created a hole in the left pec/shoulder. Nothing major - a bit of greenstuff will fix it, but it's annoying to have to deal with that in the first place...


You can see the problem in the top center picture, to the right of the dorsal hair crest.


So from this piece, a set of back spikes (not really spikes as they're rounded, but I can't figure out what to call them) go in, as do a pair of arms (again, with one having a peg, the other a socket), and a head.

The back spikes:


The head:


Which also gets a pair of odd, rounded, spike things:

The outstretched left arm:


And the right arm, which is meant to hold a staff of some sort. Note how the hole for said staff is made - again, a bright way of doing things which reduce possible breakage and allow for the model to hold it at various heights. Delightful!


Here's the staff, note that there are a pair of molding issues on one side of its prongs. Again, nothing major, or that a bit of greenstuff won't fix, but it's frustrating to have to deal with that, as such molding problems shouldn't be occurring in the first place:

 And finally, a smaller pair of prongs to go into the staff:


And here are the assembled and primed models:


Come back soon for the next article in this set - we'll be looking at a troop type and their unit leaders: the Pelegarth!